When we last left our story...
A whole bunch of nutrient dense, healing Bone Broth was left in our refrigerator after having been made in a pressure cooker. In this installment of our Bone Broth series, we will pressure can our Bone Broth to make it shelf-stable. This will ensure our supply is preserved without having to send extra money to the power company every month, or clog up all of our freezer storage space. Plus, when we travel we can pack it along without fear of spoilage.
Also, note, that if you have to delay a bit between making your Broth and canning it, you may. Almost all broth will have a fat cap floating on the very top of the liquid once cooled (it looks like a white or yellow-tinted layer). This "cap" acts as a seal, and allows the Broth to stay good for up to 6 days (as a rule of thumb). So, you can brew your Bone Broth on Sunday and then pressure can it on the following Saturday if you don't have two days in a row to complete your project - just as long as you do not disturb the fat cap.
Pressure canning is really very simple. It may seem intimidating, and you may worry about having something spoil. But, in reality, we have been pressure canning in the United States for a hundred years or more. Additionally, the USDA has spent considerable tax dollars in studies and research documenting the safety of pressure canned goods. A simple Google search will reveal a couple hundred, government sponsored videos and detailed instructions on correct pressure canning methods. What I will detail below is no different. In fact, Eve and I learned how to pressure can from a county extension office class near our Ranch a few years ago.
So, lets begin...
First we need to remove our Broth from the fridge, and let it come to room temperature. Place a small amount (2 inches) of warm water into the pressure canner. Once the jars of Broth have come to room temperature. Take your new lids and place them in a pan on the stovetop with a enough water to cover them. Boil the water and remove the lids and place them on the tops of the jars, then spin on the jar rings. We do this because it softens the rubber seal on the lids making it more malleable and more likely to seal. Do not tighten the rings. This is important because as the product inside heats, vapor will escape out of the jars and if the rings are too tight they will bulge and you won't get a good seal.
Place the jar riser into the pressure canner and then put the jars in, one-by-one. With the large quart jars, I can fit 6 to 8, smaller jars can double stack if you have two jar risers.
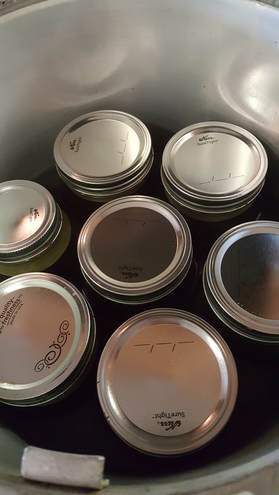 A single layer of jars with lids and rings screwed on (finger tight) in a pressure canner. | 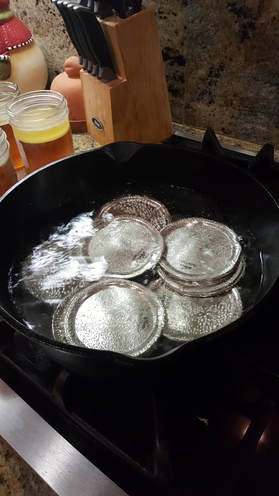 Pre-heating lids to soften the rubber liner for a more effective seal. Note the "fat cap" on the jar in the background. A "fat cap" can preserve Broth for up to 6 days if left undisturbed. |
Using low heat, begin to boil the water in the pressure cooker. Your water level should come half-way up the side of the tallest jar on the bottom layer of jars. Boil until the internal temperature of the Broth is 170 degrees. To do this, remove a single jar with the lifter. Unscrew the ring and lift off the lid. Stick a digital thermometer inside the Broth and check the temperature.
Once the Broth temperature is adequate, apply and tighten the lid to the pressure canner/cooker, but leave the weighted vent cover off until the unit is venting steam at a steady rate.
Once you apply the weighted vent cover, the pressure will begin to build inside the canner. This will be indicated on the pressure gauge. Look for 10 psi or greater (just to be safe - I run mine at 15 psi). The psi of your pressure canner/cooker varies based on your elevation, so use the USDA guide found here to be sure. Process for 20 mins if you are canning pint-sized jars or 25 mins if you are canning quart-sized jars.
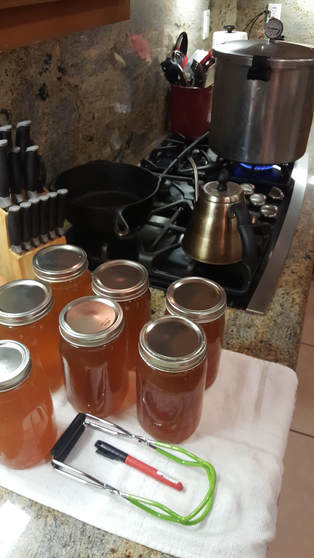 Jars cooling on the counter. Jar lifter in the foreground (with green handles) and a permanent marker to label and date the jar lids. Note also these jars are not safe to store because the dimple is "up" (look in the center of the lid. | Turn off the heat and let the canner cool naturally. Once the gauge reads zero, wait a full 10 minuets and then open the lid. Be sure to open the lid facing away from you. This will allow the steam to escape without burning your face. Lift the jars out and set them on a towel to cool. Repeat the process to can the remainder of your Broth. As your jars cool, you will hear a distinctive "ping" and notice that the dimple on the lid is down or inside. In the photo here, you will notice that the dimple is "up" meaning that the jar has not sealed properly. Now you are set. Your Bone Broth is good for a year or more. I always heat mine thoroughly before eating. Eve uses hers for Soups, Stews and as a base for Rice (substituting for water). I use it on the road when traveling between the Ranch and SoCal. As I mentioned in Part 2 - I have a 12 portable oven that I use to heat jars of Bone Broth inside my truck. I travel a lot and this little device, plus homemade Bone Broth keeps me away from restaurants while on the road. I am fond of saying that "the cattle grow in Northern California, but the customers grow in Southern California and I'm the link between the two". I would bet I spend nine cumulative weeks a year driving. Well. I hope you have enjoyed this three-part series. We love you guys and wish you the best in your Bone Broth adventures... Doug, Eve and Staff SonRise Ranch |
 RSS Feed