SonRise Ranch | Grass-fed Beef, True Pastured Pork and Chicken
  • The Ranch
    • CLA's in Grass-fed, Grass-finished Beef
    • Bio of a Lunatic Rancher
    • Low Impact Ranching
    • Ranch FAQs
    • Ranch Description and what we feed
    • Visit our Guest Ranch
    • Who Is SonRise
  • Shop
    • Membership and Individual Cuts
    • Bulk Packages and Wholesale
  • Ranch Videos
  • Blog
  • Contact
    • e-mail us
    • Sign up to receive our Blogs via email
    • Weekly specials sign up
  • SonRise Internships 2025

How to cook a steak

12/26/2018

4 Comments

 
Lets take a break this week from examining the terrible condition of our Nation’s food production for a great steak. In fact, there is no problem, so far as I know, that cooking and eating a great steak can’t solve.

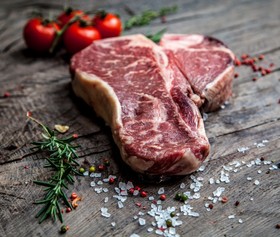
I tend to use only salt my steaks. A really good, high quality salt such as Himalayan Pink Sea Salt can usually be found at a natural grocer. More exoctic salts exsit, to be sure, but they are hard to find and unless you are a real steak effecanato, you will not notice the difference.

If your steak is from SonRise Ranch, it will be dry aged. Dry aging is a process of curing, that occurs before the steak is packaged. Dry aging reduces moisture by 12 to 15% and enzymes inside the meat activate to soften the muscle fibers making the steak more tender. In this sense a Top Sirloin is magically elevated in tenderness to a New York. A New York becomes a Filet and a Filet becomes something out of this world. Further, this moisture inside the muscle can be likened to following distance for a Semi-Truck on the freeway. Less of it and you are more likely to wreck your steak.

So, you must cook a dry aged steak more carefully by methodically planning the overall process. I don't want to complicate this, but I have seen a fair share of customers, all too familiar with cooking the poorest quality store bought, industrial, wet aged meat, purchase a $50 Rib Steak from us only to ruin it by accidently turning it into shoe leather on their grill. The principles cooking for industrial, corn-fed, feedlot beef are far different than true Grass-fed & finished, dry aged beef. The saying we use is "Low and Slow" - use a low heat, and plan on a longer cook time.

If you like more than just salt, here is a nice mixture of spices that seem to bring out the grass-fed & finished flavors with exuberance and flair. Begin by mixing up a batch of our special seasoning in the following portions. Each “part” can be a teaspoon or some other standard measurement – thus allowing you to “scale” up or down without doing math…
Picture
  • SonRise Recommended Steak Rub

  • 6 parts Himalayan Pink Salt (Reserve this - see note below)
  • 4 parts Organic Paprika
  • 2 parts Ground Pepper
  • 1 part Organic Garlic Powder
  • 1 part Organic Onion Powder
  • ½ part Organic Coriander
  • ½ part Organic Turmeric

Note: Salt tends to wick moisture. In order to avoid this we recommend coating the steak first, in the ingredients listed above without using the 6 parts salt. Then rest between 30 minutes and overnight. The salt should be added just prior to searing the steak (step 4 below)

To cook a Dry-Aged Steak properly we recommend the following...

1. Thaw and bring to room temperature. Do not cook a cold steak, or a warm steak - beginning temperature is very important.

2. You can submerge your vacuum sealed steak in a cold sink of water to thaw quickly, but only if the bag has a water tight seal - otherwise, water will seep into your bag and make your steak wet and soggy.

3. Melt Lard or Tallow in a very hot cast iron skillet on the stovetop, while simultaneously preheating your oven to 400 degrees.

4. Salt and if necessary season the steak - rub the seasonings in vigorously. This will help transfer the favor deep into the muscle. Just prior to the next step apply the reserved Salt to the exterior of the steak.

5. Sear the steak on very high heat (500 degrees or more) for 1 to 1:30 minutes each side. Look for a "crisp" crust on the steak. The room will fill with smoke, so be sure to have the overhead fan on. Have you ever driven by a steakhouse during dinnertime? The smoke is billowing out of the overhead vent. I usually open a door, so my wife doesn't come streaking down the stairs when the smoke alarm goes off... 
​
6. Transfer the skillet to the oven (now at 360 degrees), or to a preheated Salt Block and cook as follows...

*Doneness                                        **Cook Time 
Rare                                                  3 mins
Med                                                  5 mins
Well (not recommended)          7 mins


*These numbers are for a average thickness steak (1 to 1.5") and may very slightly - experiment around by 15 seconds or so, and become an expert. It will be well worth your time.
​
**Hint - use a timer for this, and be very exact.

5. Remove from cast iron and transfer to room temperature plate, do not keep on the skillet for more than the time listed above.

6. Cover in foil with reflective side towards steak. Crimp edges around plate. Rest for full 10 mins with no movement at all (you'll be tempted to look or cut - don't).
​

7. Cut against the grain and enjoy.
4 Comments

Bone Broth - done right! (part 3 of 3)

12/12/2018

0 Comments

 
When we last left our story...

A whole bunch of nutrient dense, healing Bone Broth was left in our refrigerator after having been made in a pressure cooker. In this installment of our Bone Broth series, we will pressure can our Bone Broth to make it shelf-stable. This will ensure our supply is preserved without having to send extra money to the power company every month, or clog up all of our freezer storage space. Plus, when we travel we can pack it along without fear of spoilage.

Also, note, that if you have to delay a bit between making your Broth and canning it, you may. Almost all broth will have a fat cap floating on the very top of the liquid once cooled (it looks like a white or yellow-tinted layer). This "cap" acts as a seal, and allows the Broth to stay good for up to 6 days (as a rule of thumb). So, you can brew your Bone Broth on Sunday and then pressure can it on the following Saturday if you don't have two days in a row to complete your project - just as long as you do not disturb the fat cap.

Pressure canning is really very simple. It may seem intimidating, and you may worry about having something spoil. But, in reality, we have been pressure canning in the United States for a hundred years or more. Additionally, the USDA has spent considerable tax dollars in studies and research documenting the safety of pressure canned goods. A simple Google search will reveal a couple hundred, government sponsored videos and detailed instructions on correct pressure canning methods. What I will detail below is no different. In fact, Eve and I learned how to pressure can from a county extension office class near our Ranch a few years ago.

So, lets begin...

First we need to remove our Broth from the fridge, and let it come to room temperature. Place a small amount (2 inches) of warm water into the pressure canner. Once the jars of Broth have come to room temperature. Take your new lids and place them in a pan on the stovetop with a enough water to cover them. Boil the water and remove the lids and place them on the tops of the jars, then spin on the jar rings. We do this because it softens the rubber seal on the lids making it more malleable and more likely to seal. Do not tighten the rings. This is important because as the product inside heats, vapor will escape out of the jars and if the rings are too tight they will bulge and you won't get a good seal. 

Place the jar riser into the pressure canner and then put the jars in, one-by-one. With the large quart jars, I can fit 6 to 8, smaller jars can double stack if you have two jar risers. 
Picture
A single layer of jars with lids and rings screwed on (finger tight) in a pressure canner.
Picture
Pre-heating lids to soften the rubber liner for a more effective seal. Note the "fat cap" on the jar in the background. A "fat cap" can preserve Broth for up to 6 days if left undisturbed.
Using low heat, begin to boil the water in the pressure cooker. Your water level should come half-way up the side of the tallest jar on the bottom layer of jars. Boil until the internal temperature of the Broth is 170 degrees. To do this, remove a single jar with the lifter. Unscrew the ring and lift off the lid. Stick a digital thermometer inside the Broth and check the temperature.

Once the Broth temperature is adequate, apply and tighten the lid to the pressure canner/cooker, but leave the weighted vent cover off until the unit is venting steam at a steady rate.

Once you apply the weighted vent cover, the pressure will begin to build inside the canner. This will be indicated on the pressure gauge. Look for 10 psi or greater (just to be safe - I run mine at 15 psi). The psi of your pressure canner/cooker varies based on your elevation, so use the USDA guide found here to be sure. Process for 20 mins if you are canning pint-sized jars or 25 mins if you are canning quart-sized jars.
Picture
Jars cooling on the counter. Jar lifter in the foreground (with green handles) and a permanent marker to label and date the jar lids. Note also these jars are not safe to store because the dimple is "up" (look in the center of the lid.
Turn off the heat and let the canner cool naturally. Once the gauge reads zero, wait a full 10 minuets and then open the lid. Be sure to open the lid facing away from you. This will allow the steam to escape without burning your face. Lift the jars out and set them on a towel to cool. Repeat the process to can the remainder of your Broth. 

As your jars cool, you will hear a distinctive "ping" and notice that the dimple on the lid is down or inside. In the photo here, you will notice that the dimple is "up" meaning that the jar has not sealed properly. 

Now you are set. Your Bone Broth is good for a year or more. I always heat mine thoroughly before eating. 

Eve uses hers for Soups, Stews and as a base for Rice (substituting for water). I use it on the road when traveling between the Ranch and SoCal. As I mentioned in Part 2 - I have a 12 portable oven that I use to heat jars of Bone Broth inside my truck.  I travel a lot and this little device, plus homemade Bone Broth keeps me away from restaurants while on the road. I am fond of saying that "the cattle grow in Northern California, but the customers grow in Southern California and I'm the link between the two". I would bet I spend nine cumulative weeks a year driving.

Well. I hope you have enjoyed this three-part series. We love you guys and wish you the best in your Bone Broth adventures...

Doug, Eve and Staff
SonRise Ranch

​
0 Comments

Bone Broth - done right! (part 2 of 3)

12/4/2018

0 Comments

 
Picture
In last week's Blog we gathered some of our supplies and equipment to process a batch of homemade, nutritious and shelf-stable Bone Broth. We discussed the nutritional benefits of Broth, why and how we should source bones and discussed the economic and nutritional advantages of making medium to large size batch runs of Broth.

This week we look again, briefly, at some further benefits of Bone Broth. Then we will discuss in detail the types of bones to use and our method for preparing Bone Broth in a pressure cooker.

In our discussion next week we will detail how to preserve our Broth using a pressure canner to make it shelf stable and avoid the requirement for refrigerated storage (it's easier than you think - trust me).

First - lets look into why we need Broth.

Our guts are damaged. Period.

If you are an American - your gut is damaged. I can confidently say this as I know most of my readership is from the United States. Ok, sure, some of you have guts that are okay (maybe 3%) but the rest of you are a hot mess - really. Unless you grow everything, don't eat out, never visit a non-organic relative or friend's house, have a completely organic biological lifestyle (down to the toothpaste you use) and there is scarcely a barcode found in your pantry or refrigerator, I can confidently assess that you a have some level of gut leakage.

The chief culprit - glyphosate.
You remember glyphosate, right? The chemical that the USDA and FDA tell us is ok eat. I am sure the USDA and FDA are correct because they are headed by the same guys that formerly worked for Monsanto. Now, these buffoons are running the agencies directly responsible for the oversight, testing and regulation of Monsanto's golden child product called "RoundUp". Care to guess what the chief ingredient in Roundup is?

Yep... glyphosate.

Scientist are now testing umbilical cord blood from prenatal children and finding glyphosate. Can you believe that? This stuff is everywhere... Thanks Monsanto!

Why?

We have now had over three decades of rampant pesticide use. Oh, and not by coincidence, during the same three decades, significantly increasing levels of disease and chronic illness. We have over 900 dead zones in the United States - places where no life exists due to excessive nitrogen use and accompanying pesticides/herbicide use. Our guts, with their three-trillion member society of helpful bacteria are clogged with chemicals.

You see, when chemicals, like glyphosate enter our gut lining, small cracks form and leak microscopic food particulate directly into our bloodstream.

Now, follow me here, what happens when a foreign object (of any sort) enters our blood stream?

That's right - send in the histamines.

Foreign invaders (in this case food), once detected trigger our immune response and are met with the all-powerful histamine. This is normal and usually how we stay healthy. Now, once that histamine response takes place, our headquarters in the immune system catalogs the event and keeps a handy histamine remedy on file for later use. The next time that invader is spotted the response is even faster! Launch the histamines... This is why your eyes water so quickly when you frolic in a wheat fields, at age 40, or why you have a sneezing fit in a next to a cotton tree, but not quite so quickly when you are a kid.

Unfortunately, this is happening with all types of food. I remember in the good'ole days when there was only one kid in my homeroom class that had an allergy to food, maybe two. Today - its everywhere! The BBC just released this piece on the subject.

Allergies are increasing, but why?

I contend - and bear in mind, I am a lunatic Rancher - that we are destroying our guts at an unprecedented rate. That our guts then leak food into our bloodstream, and our immune system reacts just like it should.

So then... the answer?

If I might invoke the Bible - "physician, heal thyself"

Thus we come to the subject at hand, Bone Broth, be it Chicken, Pork or Beef from truly pastured livestock can heal a gut faster than any other remedy. Once your gut heals - don't stop. Gut maintenance is essential. Most nutritionists recommend 8 ounces per day for maintenance.
Bone Broth is the key, however, just as we discussed in part one, you must source bones from the cleanest possible provider.

Ok, now, lets begin cooking...

First, choose bones based upon your desired outcome. Here is a guide to use as a rule of thumb...
  • Beef Marrow Bones - Uses include; Dental Healing, Gut Healing, Immune System Support.
  • Beef Knuckle Bones or Oxtail - Uses include; Arthritis, Joint Health, Old Guys that Run or Jog regularly (the same reason to take MSM w/ glucosamine). Oxtail is just what it sounds like - tail bone joints.
BTW - If you've made high-collagen Broth correctly the consistency at room temperature will be like jello (see the video to the left)

Loaded with collagen, my wife uses this for thick hair, long nails and tight skin. And for the record, she is stunning!

The collagen comes from the "slick" padding between the bones in an animal (we have it too) but because a Beef is such a large animal compared to us, we can harvest a significant amount from just a few joints (A.K.A. Knuckle Bones).
Picture
  • Beef Soup Bones - if a bone is not marrow or knuckle, we call it a "soup bone". These are generalized bones from the rest of the animal and should make up about 75% of the "1/3 rule" (discussed later). These bones have plenty of meat and fat on them - both of which give a delicious flavor to your Broth. 
  • Chicken Back and Neck Bones - these form the 1/3 base rule for any chicken Broth. 
  • Chicken Feet - ok, before you get grossed out, let me explain. As mentioned previously a beef's joints have connective padding between them, just like us, but unlike us, they have very large joints (a Cow can weight 10x as much as we do). So, in order to have high collagen content Broth, you need only a few Beef Knuckle Bones. On a Chicken, however, it's a different story. Their joints are very small, so you need a bunch of them close together. Hence, the need for feet added to your Broth. Chickens have 16 small bones in each foot, this, plus the claws make for outstanding collagen. Trust me, it's worth it.  Now. a word of caution - don't use just any feet. Get them from a clean source -we have them, other Ranchers do too. 
​Now for the veggies. If you can, use veggies that you've grown yourself - so as to avoid glyphosate. If necessary, buy them from someone (notice I did not write "someplace") you know. This may be expensive, but if you goal is to heal your gut, it will be worth it. Now, that being said, the majority of the cost in this project will be in high-quality bones. We are making Bone Broth, not "veggie broth". The nutritional base here are bones. 

Always, always, always roast your Beef Bones before making your Broth. This will make your Broth taste like a steak not a soggy beef sandwich. Roast them for 40 minutes at 400 degrees. Use a sheet pan. When you are done, pour off the fat.

I make my Broth in a five gallon batch. This helps keep my labor down to a minimum (a little more work makes a bunch more Broth) and will produce enough Broth for about 3 months. 

Confession - I drink a lot of Broth. I take it on trips to back and forth to the Ranch. I have a portable stove in my truck, about the size of a lunch pail that plugs into the 12v. cigarette lighter and can warm up a glass jar of Broth in 15 minutes. I sip and drive. Eve will pack me pre-cooked, cut chicken breast and veggies. I will add this to my jar of broth then cook it in my heater a bit longer (it makes my truck smell like heaven). Now I have a chicken or beef soup. It keeps me away from truck stop food and I arrive feeling rested, full and healthy. 

For a five gallon batch use (1) whole cut onion with the skin on, (1) bunch of celery with leaf, (4-6) carrots with skin on but roots cut, (4) cloves of garlic, salt and pepper. I've chopped it and pureed it in a cuisinart or juicer - both methods work well, but the latter will bring through more of the veggie flavor. You can get really creative at this point. I have tried many variations, but I always come back to a basic recipe. One reason for this is that when you take your broth off the shelf to use in a soup, stew or to make rice, you can then add whatever suits your fancy.

Toss everything into the pressure cooker, using the "1/3" rule...

1/3 of the total pot depth is bones (all types inclusive), then add the veggies and spices, next fill with water. Leave about 3"at the top for expansion. Seal the cooker - it will lock down like a canister for a nuclear reactor. Some have little hand wheels that screw down, others, like the one pictured below lock with a quarter-turn, cockwise of the top.

Heat your pressure cooker on high until you get about 10 psi, then reduce to a simmer to maintain 10 psi. Let the pressure cooker run all day, or about 6 to 10 hours (the longer the better). Then simply shut off the heat. It will depressurize after about an hour. You can tell it is ready to open when the gauge reads zero and the top can detach (they have a safety that will prevent the top from opening under pressure - so don't worry)

Picture
In our next installment we will pressure can our Bone Broth, saving both time and money
Picture
Strain out all the veggies and bones using a fine mesh strainer. Don't attempt to feed bones to any Pets.
Once the pressure cooker is cooled (but not too much), begin the straining process.

Strain out all the broth and fill all the Jars you have collected for the project. I strain twice, once, to get the big stuff and again using a finer mesh strainer for the smaller particulate. You want the broth clean, and you'll want to strain it before it chills too much. Remember the collagen? Can you imagine staining that at room temperature - not fun, trust me.

Be sure to compost or recycle the bones and veggies - but don't feed them to a pet. They will splinter and kill the animal.

Now, after the batch reaches room temperature, place the bone broth in the fridge for the night. Tomorrow we will pressure can it for the shelf (this will be covered in part 3 of 3)

Until then, your house will be filled with a sweet aroma - that of healing Bone Broth.
0 Comments
    Join our Email List

    Tags

    All
    A2/A2 Raw Milk
    Bees
    Broth
    Cholesterol
    Clean Eating
    Conventional Vs. Grass Fed
    Cooking
    Dry Aging
    Environmental
    Feed Lot Beef
    Foodie
    Free-range
    Free Range Vs. Pasture
    Good-bacteria-vs-bad
    Good Fats
    Grass
    Happy-hogs
    Import Beef
    Intern-and-apprentice-program
    Laws That Hurt Farms
    Logging Without Laws
    MIG
    Milk Cows
    Overgrazing
    Pasture Based Livestock
    Pastured Chicken
    Pastured-pork
    Polyface
    Rancher Environmentalist
    Raw Butter
    Raw Milk
    Real Grass Fed Beef
    Real-pastured-pork
    Recipe
    Shipping
    Son Rise Ranch
    Types Of Animal Feed
    Wild Fires

    Archives

    October 2024
    July 2024
    May 2024
    September 2023
    July 2023
    May 2023
    April 2023
    March 2023
    July 2022
    June 2022
    April 2022
    January 2022
    September 2021
    August 2021
    May 2021
    October 2020
    June 2020
    April 2020
    March 2020
    February 2020
    January 2020
    April 2019
    March 2019
    February 2019
    December 2018
    November 2018
    October 2018
    September 2018
    August 2018
    July 2018
    June 2017
    April 2017
    March 2017
    September 2016
    August 2016
    July 2016
    December 2015
    January 2015
    December 2014
    November 2014
    October 2014
    August 2014

    RSS Feed

Proudly powered by Weebly